Preparatory work
If you have not already done so, please first install the GNOME network manager via the package management of your system. Note: The KDE Network Manager does not currently (3rd quarter 2009) support 802.1X authentication.If available, please deactivate the WLAN module of your computer (switch on the notebook case, special function key, etc.). The Studierendenwerk currently only operates WLANs in some dormitories (see start page).
You also need the security certificate "Deutsche Telekom Root CA 2" or "USERTrust RSA Certification Authority" (HSBI students). First obtain this from a reliable source (e.g. from the DFN homepage), check its authenticity using the checksum always specified and save it in a suitable location on your computer. For further details, please refer to 'Linux in general'.
Configuration

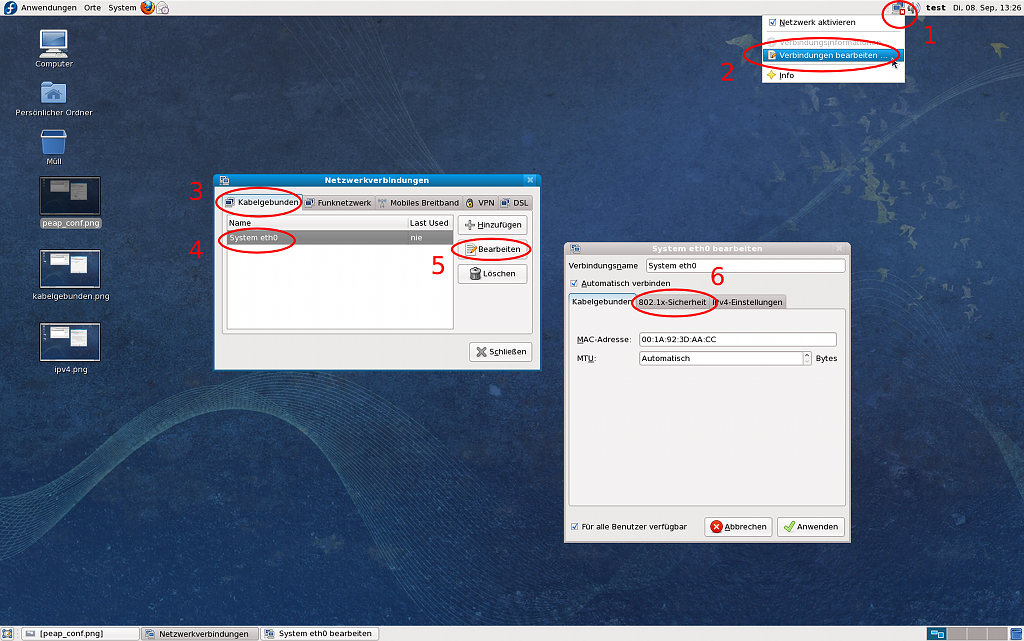
Open the configuration window of the Network Manager by clicking on the network icon (1) in the taskbar and selecting "Edit connections" in the following menu (2). The "Network connections" window opens. Select "Wired" (3). A list of your Ethernet adapters will be displayed. As a rule, select "eth0" (4) here. Then click on "Edit" (5). Another window will open in which you should select "802.1x security" (6).


Activate 802.1x authentication, select "protected EAP",
as anonymous identity please select "eduroam@uni-bielefeld.de" for students of the university,
Students of Bielefeld University of Applied Sciences, on the other hand, please select the full user name with realm as the anonymous identity, e.g. "jdoe@hsbi.de" or leave this field blank,
Continue with "automatic" for the EAP version, "MSCHAPv2" as internal authentication. Enter the path to the certificate "T-TeleSec GlobalRoot Class 2" for students of Bielefeld University or "USERTrust RSA Certification Authority" for students of Bielefeld University of Applied Sciences (Hochschule) on your computer, enter your user name with full realm, e.g. mmustermann@uni-bielefeld.de or jdoe@hsbi.de and your password (university, university of applied sciences, sixth form college)

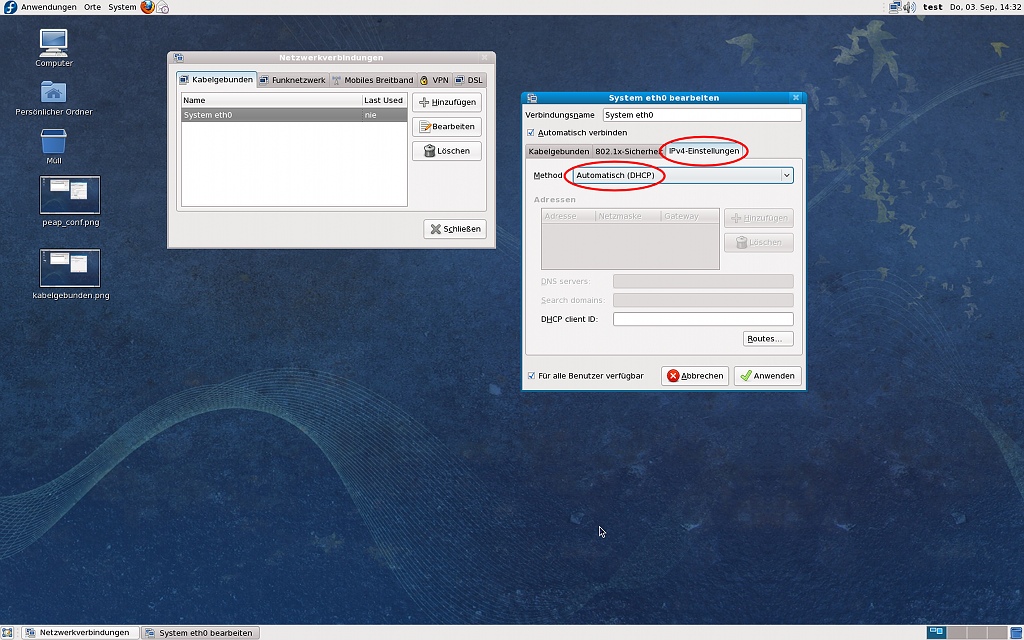
Then select the "IPv4 settings" and then "Automatic". Finally, click on "Apply" and close the configuration window. Your computer will now authenticate you and obtain a valid IP address. The configuration is now complete.

 Home
Home 
